Creating graphics patches
Acknowledgements
My thanks go to the following people who made this guide possible.
- sb61q2v4 for creating the original guide
- "GRADE*ONE:DFM - DiGiTAL SATANiSM" for translating it from the original french to English - original article here
Please read this first
This tutorial explains how to create a graphics patch using the most recent version of Samsung Firmware Editor. If you need to download this software, there is a link on the download page.
As usual, I must remind you that flashing your handset can render it unusable and I take no responsibility for any damage.
You will need the following
- The graphics files you wish to flash
- The appropriate firmware file
- Samsung Firmware Editor version 2.01.38 installed into a folder of your choice.
Using Samsung Firmware Editor
The process for creating a patch starting with a .s3 firmware file is shown in detail in both the flash and the text tutorials.
It involves the following steps:
- Creating a .bin firmware file from the .s3 (Only needs to be done once)
- Creating a firmware profile .sdf file (Again, only needs to be done once)
- Creating one or more .spf patch files
- Applying the patch file(s) and creating a .s3 which can then be flashed to your phone
Please note
A patch created for a particular firmware file can only be applied to a handset with that firmware. If you handset uses E900XXFJ2, do not try to apply a patch created for E900XEFJ1 or your phone may not work. If you do make a complete pig's ear of things, reflashing the original unmodified firmware may put things right.
Creating a .bin firmware file
- First off, convert your S3 firmware to .bin, so we can modify it.
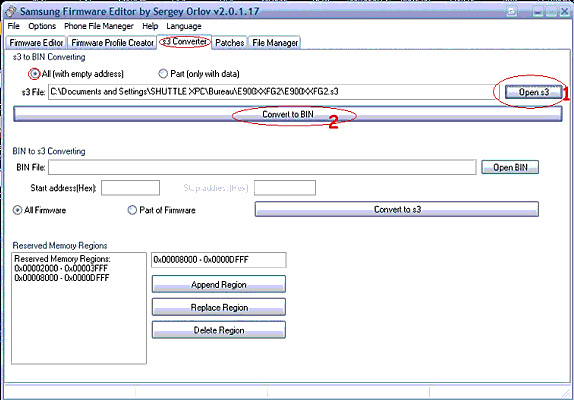
- Go into the s3 converter - check that "all Firmware" is ticked - click on open s3 and select the firmware which you want to modify. Then click on convert to bin and choose the directory in which to save it.
- The progress bar under the convert button will start moving.
- At the end of conversion SFE will not say "finished or anything" it will just disappear.
Creating a .sdf firmware profile file
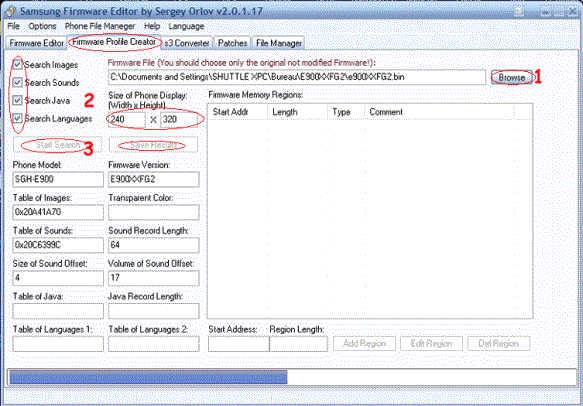
- Go to the Firmware Profile Creator:
- This stage is necessary to modify your Firmware!!!
- Click on browse and to find the Bin which has been just converted
- then tick all the boxes (2) and in Size of phone display put 240x320
- click on start Search...
- Once finished this window will open:
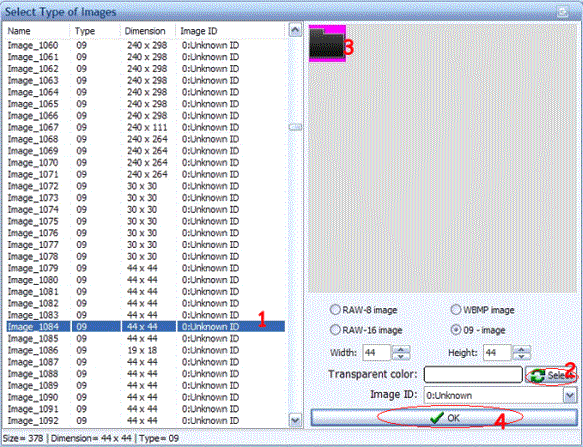
- Find an image which contains a pink contour
- Click on Select and you will have a hand cursor to select the transparent color which is the pink in background of the graphic.
- Then click on OK, normally it saves your progress automatically in the .SDF, if not it is necessary to click on "Save Result"
- To check it has saved .SDF properly > go in the program folder of SFE and you have a folder named "firmware" look in it and make sure you have "name of firmware".SDF inside. e.g. E900XEFJ1.sdf
Creating the .spf patch file
Now the fun bit:The personalization of your firmware can start
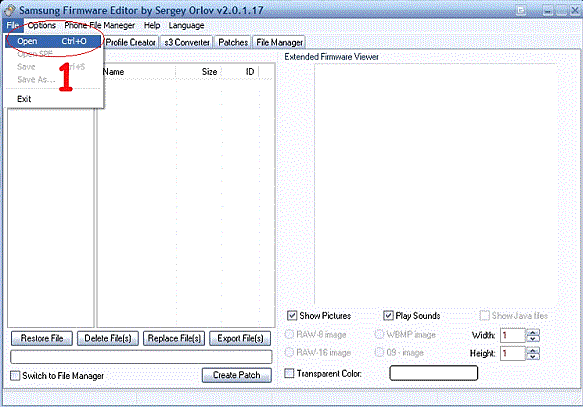
Open and find your firmware.bin (open File/) "It is possible that the software requires you to open .SDF. If it does load the last one you just made for the firmware.
- Cool, you've now opened your Bin finally!
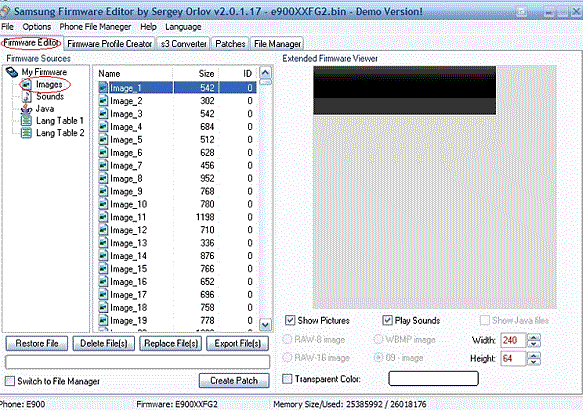
- Go into the Firmware editor: - double click on the part wished... images,sounds etc.
- Here will be the images - select the image to be modified...
- THE IMAGES WHICH YOU MODIFY MUST HAVE THE SAME DIMENSIONS BUT NOT FORCING the SAME SIZE (size)! You can release some space by deleting unwanted pictures from the place when you replace some, example: cherries, the lame footballers etc. (if they were Spurs we could leave them but they're not so they can go, lol)...
- PS: Especially do not replace the images that look "saturated or badly distorted" if you do your future patch will generate a flash error!!!
- In short, Let us get to the creation of your patch once you've finished modifying:
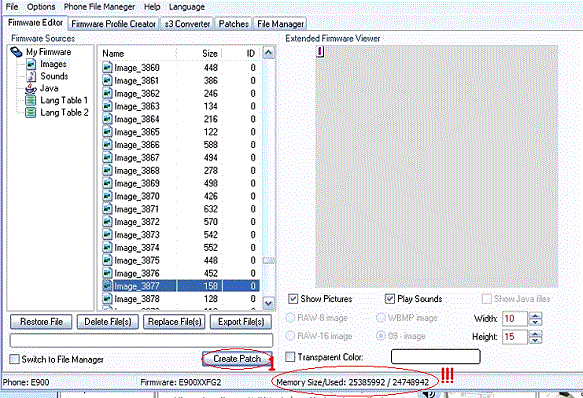
- First of all, if while clicking on create patch you have "NO MEMORY" popup, it is that Memory Size/used is not respected:
- /used "must be lower than "Size/" as on the example! Thus when you modify always keep an eye above...
- When you click CREATE PATCH you have this:
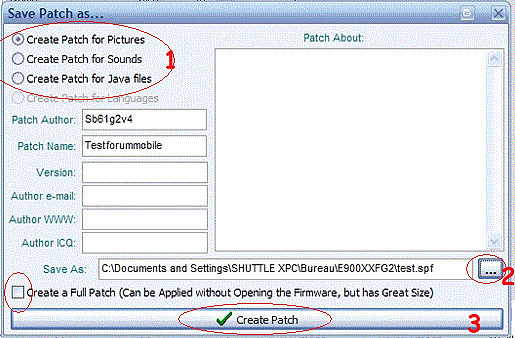
- Choose which kind of patch... i.e. for this we want "Create patch for picture"
- fill "PATCH NAME" and details
- click on "..." to choose where to save
- DO NOT TICK "CREATE A FULL PATCH" you'll be there for ages.
- and finally click on CREATE PATCH. In general the saving of the patch only takes some seconds (because it is saved in the .SPL)
- Once again you will not get a completed message or anything to let you know it's done.
- ... thus do not remain 10 years waiting for a message...
Creating the .s3 patch file
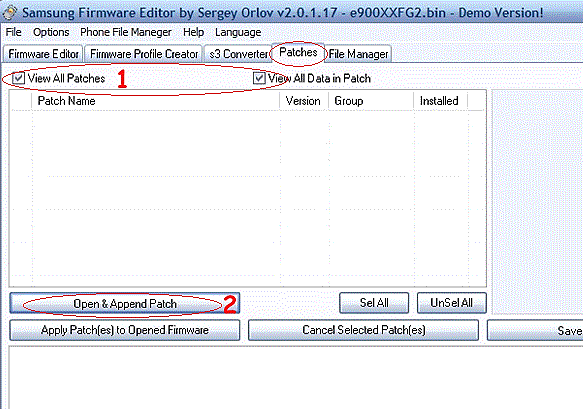
- Go to the Patches tab:
- Tick "View all Patches and Data in Patches"
- click on OPEN & APPEND PATCH, to find your SPF you just made and then select it.
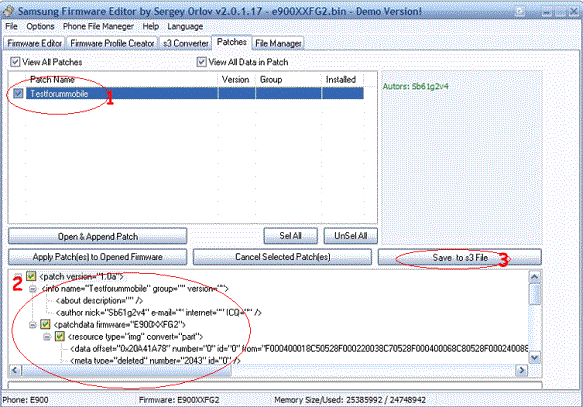
- Tick your patch and double click
- You will then have the information which it contains "to check over" if you have all the modifications of dated offset images-1086... etc... And finally click on "Save to S3 File" and choose the destination of your s3 file and wait for conversion.
- Once finished you will still not have a message of completion, if you do not see any more bar progression that is it done!
Then all that is left to do is flash your patch to your phone with Optiflash and look at your wonderfully new graphics!!!!!!